Transform your backyard into a culinary oasis with your very own BBQ island. This guide will walk you through each step.
Picture warm evenings, the scent of grilled delicacies wafting through the air, and the pride of cooking on a BBQ island you built yourself. It’s not just a dream; it’s an achievable project that can bring joy to your outdoor gatherings.
Creating a BBQ island may seem daunting, but with the right instructions, it’s a task that can add value and style to your outdoor space. This step-by-step guide will simplify the process, ensuring you have all the information you need to get started. Whether you’re a seasoned DIYer or new to the world of construction, you’ll find this guide filled with practical tips and straightforward advice. From selecting materials to the finishing touches, we’ll help you craft a functional and inviting BBQ island that will be the heart of many memorable moments. Let’s fire up those tools and begin the journey to a homemade haven of flavor and fun!

Introduction To Diy Bbq Islands
Dreaming of the perfect backyard setup? A DIY BBQ island can transform your outdoor space into a hub for entertaining and cooking. This guide will walk you through creating your own, whether you’re a seasoned DIYer or a first-timer.
Why Build Your Own Bbq Island?
Building a BBQ island by yourself means customizing it to fit your needs. You save money and get the satisfaction of creating something with your own hands.
What You’ll Gain From This Guide
This guide offers clear, step-by-step instructions. It details everything from planning to the final touches. You’ll learn how to select materials, design for your space, and build safely and effectively.
Planning Your Bbq Island
Planning your BBQ Island is the first step to outdoor cooking fun. It requires attention to detail. Let’s dive into the key steps to get your BBQ island ready.
Choosing The Right Location
Pick a spot that is safe and convenient. Keep it away from walls or fences. This prevents fire hazards. Make sure the area gets enough shade. Your guests and you will appreciate it during hot summer days.
Determining Size And Shape
Think about how much space you have. Also, consider how many people you plan to host. A larger area allows for more guests. Choose a shape that fits your space and needs. Popular shapes include L-shape and U-shape.
- L-shape: Good for small spaces.
- U-shape: Offers more prep and cooking space.
Selecting Materials And Appliances
Choose materials that last and are easy to clean. Stainless steel is a top choice for appliances. It resists rust and is easy to maintain. For countertops, granite or concrete are durable options. They can handle the heat and look great.
Appliances are the heart of your BBQ island. Pick a grill that suits your cooking style. Add a fridge and sink for convenience. Don’t forget storage for tools and spices. A table shows some common options.
| Appliance | Use |
|---|---|
| Grill | Cooking |
| Fridge | Keeping food and drinks cold |
| Sink | Cleaning up |
| Storage | Tools and spices |
Designing Your Bbq Island
Imagine your dream BBQ island. Picture friends gathered, grilling underway. Your design makes it happen. Let’s plan your perfect outdoor kitchen. Details matter, so we’ll focus on layout and storage. Ready to start?
Creating A Functional Layout
Think flow and ease. Where will you prep, cook, and serve? A good layout means easy moves from one task to the next. Place the grill centrally. Ensure room for chopping and plating. Guests should mingle without crowding the chef. Aim for comfort, convenience, and a touch of style.
Incorporating Storage Solutions
Storage is key for a tidy space. Plan for cabinets and drawers. Keep tools, spices, and plates within reach. Think about a spot for a fridge. Cold drinks should be at hand. Smart storage means more time with guests, less time searching for items. Design for function, and enjoy a seamless BBQ experience.
Gathering Your Tools And Materials
Before diving into the construction of a BBQ island, preparation is key. Gather the right tools and materials first. This ensures a smooth build process. Let’s look at what you’ll need.
Essential Tools For The Build
You’ll need several tools to build your BBQ island. Start with a tape measure for accurate dimensions. A saw is next, for cutting materials to size. Don’t forget a level. It keeps your build straight. A power drill makes hole drilling easy. Screws and nails join pieces together. Pliers and a hammer are a must too. Safety gear is vital. Think gloves and goggles. These tools are the backbone of your project.
Shopping List For Materials
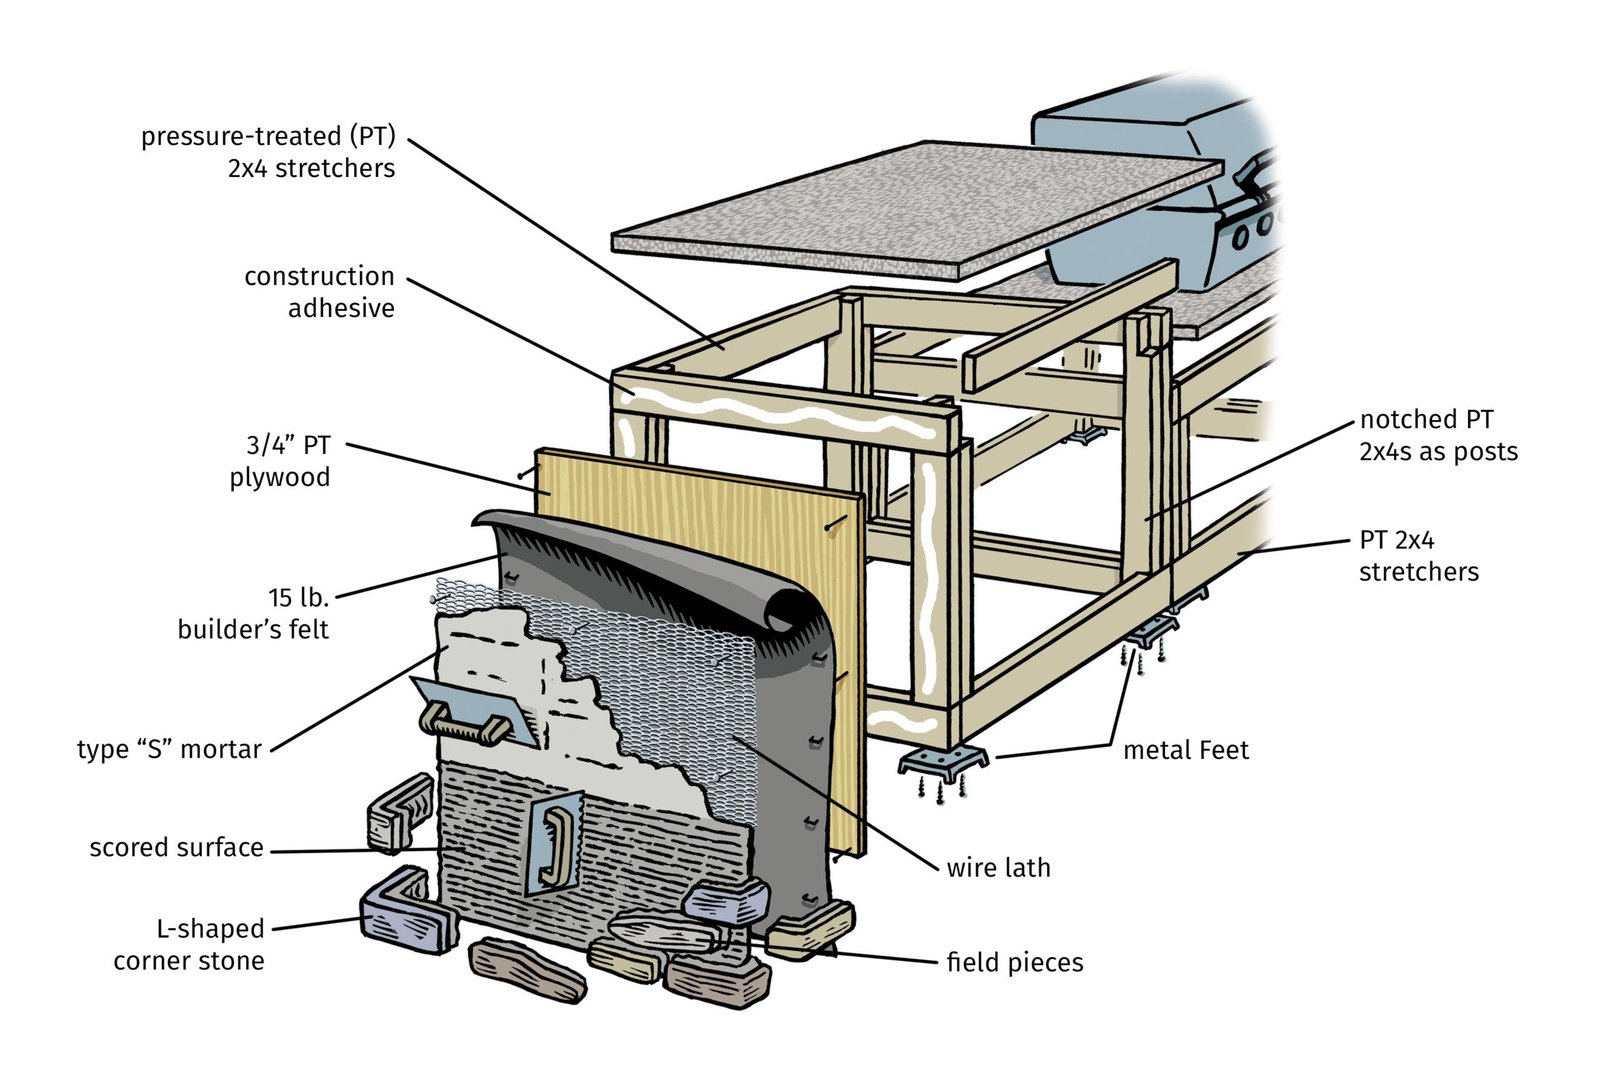
Now, let’s talk materials. You’ll need concrete blocks for the base. They are strong and reliable. A countertop surface is next. Choose one that can handle heat and weather. Metal brackets reinforce the structure. Add in construction adhesive for a firm hold. Grab some mortar mix for the blocks. Paint or sealant gives a finished look. Lastly, buy your grill insert. It’s the heart of the island. With this list, you’re set to start building.
Building The Frame
Building a BBQ island starts with a strong frame. This is the skeleton of your outdoor kitchen. A good frame means a lasting BBQ island. Let’s dive into how to build this frame.
Constructing A Sturdy Base
A solid base holds everything together. Start with high-quality materials. Use metal or treated wood. These resist weather and heat.
- Measure your space.
- Cut materials to size.
- Assemble the base frame.
- Use screws for metal, nails for wood.
Ensuring Level And Stability
A level base prevents future problems. Use a spirit level. Check each side. Adjust as needed. Stability keeps your BBQ island safe. Anchor the frame to the ground. Use concrete for a permanent hold.
- Place the frame in the desired location.
- Use a level on top.
- Adjust until level.
- Anchor securely.
Tip: Always double-check measurements. A small mistake can lead to big problems later. Take your time. Building a strong frame is the first step to a great BBQ island.

Installing Countertops And Exterior
Transform your BBQ island with stylish countertops and exterior finishes. This guide walks you through each step, ensuring durability and appeal.
Choosing The Right Countertop Material
Countertops are the highlight of your BBQ island. They must be tough and heat-resistant. Here are top picks:
- Granite – Luxurious and strong
- Concrete – Versatile and modern
- Tile – Customizable and budget-friendly
Attaching Exterior Finishing
Exterior finishing gives your BBQ island its unique look. Follow these steps for a flawless finish:
- Clean the island frame. Remove debris for a smooth surface.
- Apply mortar or adhesive. Ensure it’s outdoor grade for longevity.
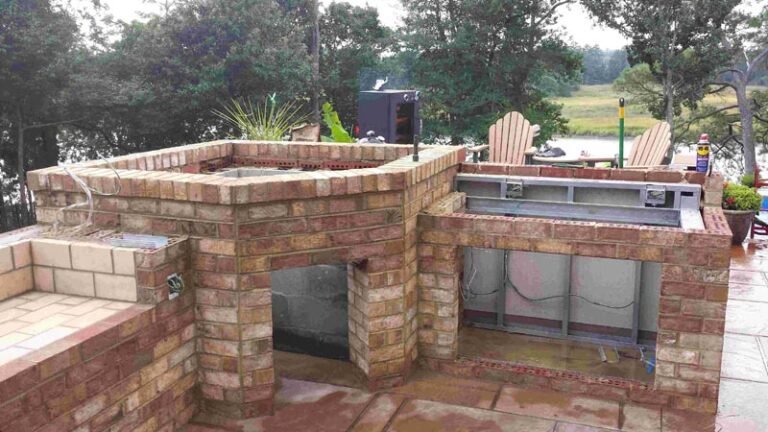
- Place your chosen material. Use stone, stucco, or tile for impact.
- Let it set. Wait for the adhesive to dry completely before use.
With the right materials and steps, your BBQ island will be the star of your backyard.
Setting Up Utilities
Setting up utilities is a crucial step in building a BBQ island. Your outdoor cooking space needs power, water, and gas to function. Let’s walk through the process of installing these essentials.
Running Gas, Water, And Electrical Lines
Begin by planning the layout of your BBQ island. Decide where the grill, sink, and fridge will go. This helps you figure out where to run the lines. For gas, you might need a professional. They ensure the job meets local codes. For water and electricity, trenches are key. They protect the lines from damage. Use quality materials to avoid future issues.
Safety Considerations
Safety always comes first. With gas, watch for leaks. Use the right tools to check. For electrical work, turn off the power first. Use outdoor-grade materials to prevent accidents. When digging for lines, know where other utilities are. You don’t want to hit them by mistake. Keep a fire extinguisher nearby too. It’s good practice.
Adding The Grill And Appliances
Let’s dive into the exciting part of building a BBQ island: Adding the Grill and Appliances. This step turns your island from a simple structure into a cooking haven. We’ll cover securing the grill and installing additional features. Simple steps ensure your island is not only functional but also safe and enjoyable for all your cooking adventures.
Securing The Grill In Place
First, make sure your grill fits perfectly in the designated space. Measure twice, cut once. Slide the grill into place carefully. Use brackets or a mounting kit if provided. These tools keep the grill stable. No wobbles allowed. Secure tightly but don’t over-tighten. You want it firm but not distorted. Double-check the fit. A well-secured grill means safety and ease of use.
Installing Additional Features
Now, let’s add more to your BBQ island. Think of side burners, a fridge, or storage drawers. Each enhances your cooking experience. For side burners, align them next to the grill. This allows easy multitasking. Installing a fridge? Make sure it’s accessible but not too close to the heat. For storage, choose drawers under the grill for utensils and spices. Each feature should make cooking easier and more enjoyable. Remember to follow the manufacturer’s instructions for installation. Proper installation means everything works as it should.
Finishing Touches
With the BBQ island structure in place, it’s time to add character and ensure safety. Thoughtful decor and lighting can transform the space. A final inspection ensures everything is up to par. Let’s dive into the details.
Decor And Lighting
- Choose weather-resistant furniture for comfort and longevity.
- Install LED lights under countertops for ambiance and safety.
- Use solar-powered accents to highlight pathways and features.
- Add potted plants for a touch of greenery and natural charm.
- Outdoor rugs add warmth and define dining areas.
Final Inspection And Safety Checks
- Check all gas connections for leaks using soapy water.
- Ensure electrical outlets are GFCI protected to prevent shocks.
- Inspect grill placement for proper ventilation and clearance.
- Verify that ignition systems are working correctly.
- Review local codes to confirm your BBQ island meets requirements.
Once these steps are complete, your BBQ island is ready to impress!

Maintenance And Care
Proper maintenance and care are key to keeping your BBQ island in top shape. With regular attention, your outdoor cooking haven will stay clean, functional, and safe. Let’s dive into the essential steps to preserve your BBQ island.
Regular Cleaning And Upkeep
Cleanliness is crucial for any BBQ island. It ensures longevity and safe food handling. Follow these simple steps for effective cleaning:
- Wipe surfaces after each use.
- Clean grates with a grill brush.
- Empty grease traps frequently.
- Check for wear and tear regularly.
Stay on top of these tasks to keep your BBQ island inviting and ready for use.
Protecting Your Bbq Island From The Elements
Outdoor kitchens face sun, rain, and wind. Protect your investment from weather damage:
- Cover your BBQ island when not in use.
- Use weather-resistant materials for construction.
- Position your island away from direct wind.
These steps will shield your BBQ island, ensuring it stands the test of time.
Frequently Asked Questions
What Materials Are Needed For A Bbq Island?
Building a BBQ island requires materials such as steel studs or cinder blocks for the frame, concrete board for exterior walls, mortar or construction adhesive, and tiles or stucco for finishing. Additionally, a countertop material like granite or tile is essential.
How To Design A Bbq Island Layout?
Designing a BBQ island starts with determining the size based on available space. Consider incorporating areas for grilling, food prep, and dining. Include storage and appliance spaces, ensuring proper ventilation and utility access for gas and electricity.
Can You Diy A Bbq Island?
Yes, you can DIY a BBQ island if you have basic construction skills. It involves building a frame, installing a countertop, and finishing the exterior. Always follow safety codes and consider professional help for gas and electrical connections.
What Is The Cost Of Building A Bbq Island?
The cost varies widely, depending on size, materials, and appliances. A basic DIY island might cost as low as $500, while a high-end custom build could exceed $10,000. Budget for materials, appliances, and any professional assistance needed.
Conclusion
Crafting your own BBQ island is a rewarding project. Follow this guide and take it step by step. You’ll create a great space for cooking and entertaining. Start with a solid plan and choose the right materials. Remember, safety first and measure twice, cut once.
Soon, you’ll be grilling on a BBQ island that’s all yours. Enjoy the process and look forward to many fun gatherings around your new outdoor kitchen!
